Exterior car body parts names with pictures | easy visual guide
You hop online to order a new mirror cap, but every listing looks the same. The photos are vague. The part names are confusing. One wrong click and you get a left mirror when you needed the right. I’ve been there. That’s why I built this simple, visual-first guide to exterior car body parts names with pictures. I’ll show you how to read seller photos like a pro, spot hidden damage, and choose parts that fit the first time. I’ll also review a helpful dent-repair strap set you can use at home to fix small dings without repainting.
[3-product-listings-blocks]
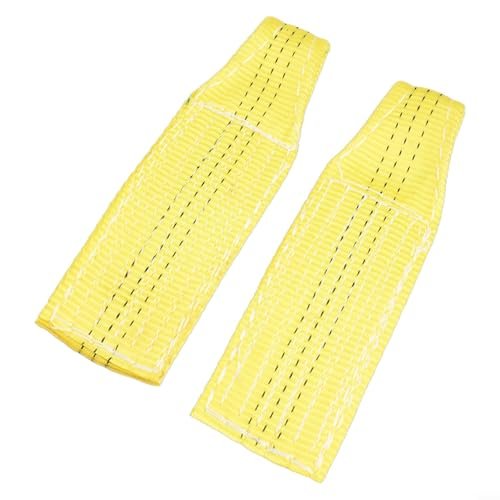
2PCS Nylon Belt Dent Repair Straps (PDR Tool)

This two-pack of heavy-duty nylon belts is built for paintless dent repair. You loop the tear‑resistant straps through a door opening, a wheel, or a tow point, then use leverage to pull out soft dents. The webbing feels tough in hand, and the stitching is clean with reinforced ends. It’s a smarter add-on to any PDR kit, especially when you need a steady anchor you can trust.
I like these belts for stubborn creases on fenders and doors where suction cups slip. They spread the pulling force so you don’t overstress a single point. Pair them with a handle lifter or a glue puller tab to get a clean lift. If you work on panels near edges, this exterior car body parts names with pictures setup gives you control without drilling holes or damaging paint.
Pros:
- Strong nylon webbing with reinforced stitching resists fraying
- Two belts included for multi-point anchoring and better leverage
- Works with common PDR lifters and glue tab systems
- Gentle on paint when used with proper pads and anchors
- Lightweight and easy to store in a trunk or tool bag
- Helpful for edge dents on doors, fenders, and quarter panels
- Reusable and quick to set up in tight spaces
Cons:
- Not a full PDR kit; you still need tabs or a lifter
- Won’t fix sharp creases or stretched metal alone
- Requires practice to avoid over-pulling thin panels
My Recommendation
If you do DIY body work, these belts are a must-have add-on. They shine on daily-driver dents where you want to save paint and time. I recommend them for owners who often park in busy lots, rideshare drivers, and anyone who buys used parts after comparing exterior car body parts names with pictures. Use them to correct light dings before you install a new molding or mirror cap.
| Best for | Why |
|---|---|
| DIY dent removal on doors and fenders | Belts anchor easily and spread pulling force for a clean lift |
| Paintless repairs before installing trim | Preps the panel so new parts sit flush after alignment |
| Owners using exterior parts guides | Pairs well with exterior car body parts names with pictures to identify damage and repair order |
The complete guide to exterior car body parts (names with pictures)
If you’ve ever shopped for fenders, grilles, or mirror caps, you know the pain. Listings repeat the same phrases. Photos look identical. Fitment notes hide in fine print. I wrote this guide to make those photos make sense. I’ll explain the exact names of exterior parts, what each photo should show, and how to match what you see to what you need. Think of this as your quick map to every panel on the car—with image cues you can spot at a glance. I’ll refer often to exterior car body parts names with pictures, so you can search smarter and avoid returns.
Front-end parts: what to look for in photos
The front of the car carries the most complex parts. Newer models hide sensors and cooling hardware behind plastic. A good set of seller photos should show the outer face, side angles, and all mounting tabs. When I scan a listing, I compare those tabs to an OEM diagram. Here’s a breakdown of the names you’ll see, with the picture details that matter.
1) Front bumper cover
What it is: The large plastic skin that gives the nose its shape. It’s not the metal bumper beam. It often includes slots for fog lights, grilles, and parking sensors. Materials are usually polypropylene blends (often labeled PP+EPDM). Paint is flexible.
What to see in pictures: Full front view, both corners, underside lip, top mounting tabs, and all sensor holes. Look for torn tabs, spider cracks near corners, and warped edges from heat. If the listing says “primered,” you should not see body color. If it’s painted, match your paint code.
Fitment tips: ADAS sensors and radar often sit behind the emblem or lower grille. If your car has adaptive cruise, you need the correct sensor cutouts. After install, some cars need radar calibration. This protects safety features.
2) Grille (upper and lower)
What it is: The open mesh or slatted piece in front of the radiator. Some cars split it into an upper grille near the emblem and a lower grille in the bumper.
Photos to check: Close-ups of clips and tabs. Look for broken mesh, chipped chrome, and emblem mounts. If the listing says “with camera,” confirm the camera hole and bracket.
Buying tip: Many 2024–2026 models use active grille shutters behind the grille for aero. That part is separate. Don’t confuse them in photos. The shutters have fins and a motor plug.
3) Hood (bonnet)
What it is: The hinged metal or aluminum panel over the engine. exterior car body parts names with pictures might have an inner frame and sound pad.
Photos to check: Skin, crumple zones, hinges, latch area, and underside frame. Look for hail dents, kinks near hinges, and rust at the front edge. Small dents near the front lip show up when light hits low.
Buying tip: Aluminum hoods are light but dent easier. Steel hoods are heavier and can rust if the paint is chipped. The paint code matters if you want to skip repainting.
4) Headlights (left/right assemblies)
What it is: The sealed housing with a lens, reflectors, and electronics. 2025–2026 cars often use LED projectors and dynamic turn signals. Matrix LED and laser options exist on high trims.
Photos to check: Front lens for haze or cracks, rear caps, mounting ears, and connector plugs. Look for missing ballast modules. If the lens has tabs that are plastic-welded, check for repairs. Ask for a photo of the DRL strip lit up if possible.
Fitment tip: Adaptive lights need coding or calibration. A base halogen housing will not work on an LED car without rewiring. Watch the exact part number suffix.
5) Fog lights and daytime running lights (DRLs)
These sit low in the bumper. Seller photos should show the bracket, lens, and plug type. Many DRLs are integral to the bumper trim. Make sure the listing includes both the light and the bezel if needed.
6) Front fenders (left/right)
What it is: The metal (or sometimes plastic) panels over the front wheels. They meet the bumper, hood, and door. Small alignment matters here.
Photos to check: Top flange holes, lamp cutouts, and the lower rear edge where road debris chips paint. Look along the arch for waves. Check the inner lip for rust bubbles.
7) Side mirrors (manual, power, heated, with sensors)
Modern mirrors can house blind-spot radar lights, puddle lamps, and 360° cameras. A proper listing will show the cap, glass, underside, plug shape, and camera if present.
Don’t mix up caps (painted outer shell) with the full mirror assembly. The part names in exterior car body parts names with pictures usually separate “mirror cover,” “mirror glass,” and “mirror assembly.”
Side profile parts: doors to rocker panels
Side panels sell fast and crack easily. Study door edges and rocker panels in photos. If you see chipped paint at edges, plan on touch-up. Here are the names you’ll match to photos when you shop by exterior car body parts names with pictures.
8) Doors (shells and skins)
What it is: Outer shell plus an inner structure. Hardware includes glass, regulator, latch, handle, and mirror mounts. Sellers often list “bare shell” or “complete.”
Photos to check: Outer skin, inner frame, hinge areas, latch post, and the seam at the bottom. Doors hold water drain holes along the bottom. Rust starts there, so ask for a close-up.
9) Door handles (outer)
These can be pull-type or flush pop-out on EVs. Look for the keyhole on the driver side. Many colors are textured black or painted. Match the sensor type if your car has passive entry.
10) Rocker panels and side skirts
Rocker panels run under the doors. Side skirts are add-on trim that attach to the rocker. In pictures, check the mounting points and jacking notch covers. These parts catch curb rash and jack mishaps, so zoom in on any scrapes.
11) Quarter panels (rear)
These are large body sections behind the rear doors that wrap to the tail lamps. They are usually welded, not bolt-on, so replacements often come as cut sections. Photos should show the wheel arch lip, gas door area, and lamp corners. Look for filler lines in bright light.
Rear-end parts: trunk to exhaust tips
The rear has layered parts, much like the front. Good photos should show the outer face, inner tabs, and sensor holes. I always compare to the exterior car body parts names with pictures chart before I order anything back here.
12) Rear bumper cover
Similar to the front, but check for parking sensor rings, tow hook cover, and diffuser trims. If you tow, confirm the cutout for a hitch. Paint flex chips often show along the top ledge where you load cargo.
13) Tail lights (outer and inner)
Many cars split tail lights into an outer piece on the quarter and an inner piece on the trunk or hatch. Match both the shape and the connector. Ask for a photo of it lit if the listing allows. Look for moisture inside the lens.
14) Trunk lid or liftgate
Hinged rear closure panel. For sedans, exterior car body parts names with picturess a trunk lid. For SUVs and hatchbacks, it’s a liftgate. Photos should show the latch, hinge areas, spoiler mounts, and wiring pass-through boots. Rust can hide under the spoiler.
15) Rear spoiler
Bolted or taped to the trunk. Make sure pictures show the mounting holes and the light if it has a center brake lamp. Ask if the tape is included, but plan to buy new 3M tape anyway.
16) Rear valance/diffuser
The lower trim under the bumper. It may house reflectors or exhaust tips. Look for melted edges near the exhaust. Tabs are fragile, so inspect close-ups before you buy.
Roof and glass parts
The roof area includes glass panels and racks. Photos here should be crisp. Glare hides chips, so ask for shaded shots when possible.
17) Windshield (front glass)
Windshields on 2024–2026 cars often have camera mounts for lane-keep systems. Some have HUD-compatible glass. The top frit (black dotted band) hides adhesive. Photos should show the camera bracket, rain sensor pad, and VIN window. Replacing windshields can require camera recalibration.
18) Sunroof or panoramic roof glass
Glass panels and shades. Sellers should show the frame, drains, and motor if included. If exterior car body parts names with pictures is just the glass panel, verify measurements and tint level. Small chips become big cracks during install.
19) Roof moldings and rails
Thin trim strips at the roof edges, plus roof rails on SUVs. Tabs break often in shipping. Ask for a picture of the full length to check for bends.
Lighting, cameras, sensors, and emblems
Exterior electronics need exact part numbers. If you rely on exterior car body parts names with pictures, zoom in on connectors and labels. Tiny differences matter here.
20) Corner markers and side repeaters
Small lights on fenders or mirrors. Confirm LED vs bulb type. Check the gasket for dry rot.
21) Backup camera and 360° cameras
Commonly hidden in the emblem, tailgate handle, or mirror. Listings should show the lens, bracket, and plug shape. Foggy lenses mean poor night vision.
22) Parking sensors and brackets
Round sensors snap into bumper rings. If a listing says “sensor-ready,” look for the round mounts molded in. Some cars need painted sensor caps. Pictures should show those caps plainly.
23) Emblems and badges
Grille emblems may hide radar. Those have a smooth plastic face. Don’t swap a standard chrome emblem onto a radar car. Seller photos should show the back: radar emblems have no metal and are thick.
Trim pieces and protections
These parts add style and protect paint. They look simple, but they crack easily. Good photos prevent surprises on arrival.
24) Wheel arch moldings
Plastic arches on SUVs and trucks. Check the screw holes and clips. Road rash shows as white scuffs on black plastic. Heat can warp them slightly; look for waviness.
25) Mud flaps and splash guards
Stop road spray. Photos should show the exact contour and hardware. Front and rear often differ. I always match up the curve to a profile photo of the car.
26) Skid plates and front lips
Lower trims under the bumper or front lips that add style. Scrapes happen fast. Inspect the underside photos for gouges. Mounting holes should be clean.
27) Door edge guards and side moldings
Small, simple, but fit is everything. Make sure you see the clip type or tape. If painted, match the paint code. I look for a straight-on shot plus a side shot to check curvature.
How to read seller photos like a pro
This is where exterior car body parts names with pictures save you time and money. Names give you the search phrase, pictures confirm the actual part. Here’s a quick method I use before I click “Buy.”
- Front view: Confirms model and trim. Check the overall shape and openings.
- Angle view: Reveals dents and waves. Gloss highlights bends.
- Mounting tabs: The number and shape must match OEM. Broken tabs mean sloppy fit.
- Back side: Shows clips, brackets, foam, and sensor holes.
- Label/part number: Look for molded codes or stickers. Compare suffix letters.
- Color code: If painted, ask for a close-up of the paint sticker on your car to match.
- Lighting demo: For lights, ask for a lit photo to confirm LEDs and segments work.
Left vs right, front vs rear: avoid the common mix-ups
Listings use “LH” (left/driver) and “RH” (right/passenger) in US markets. Left and right refer to the driver’s point of view sitting in the car. Many returns happen from reversing these. Exterior car body parts names with pictures often include a little outline of the car with an arrow. Use that when in doubt.
OEM vs aftermarket: which photos should you trust?
OEM parts come from the car maker’s suppliers. Aftermarket parts can fit well, but the details vary. Here’s how I decide using exterior car body parts names with pictures and a simple checklist.
- OEM photos: Crisp tabs, molded part numbers, matching textures. More expensive, fewer surprises.
- Aftermarket photos: Sometimes a generic sample photo. Ask for real photos of the exact item.
- Fitment notes: Look for “CAPA certified” on body panels. It’s a quality benchmark for crash parts.
- Painted parts: Both OEM and aftermarket can be painted. Ask for a color code test photo in sunlight.
Body materials 101: what pictures don’t tell you
The photo shows shape, not flex. Know the material to set expectations.
- Polypropylene bumper covers: Flexible, good for impacts, easy to scuff. Marked PP on the back.
- ABS grilles: Stiffer, holds chrome well, but tabs can snap in cold weather.
- Aluminum hood: Light, dents easier, no rust. Look for sharp crease lines in photos.
- Steel fender: Stronger but can rust. Check inner lips for bubbles.
- Carbon fiber lips: Light and strong, but chips show white. Ask for close-ups of weave.
Color and finish: reading paint in photos
Matching paint saves time. But photos can lie. Here’s a simple rule set I use when I browse exterior car body parts names with pictures.
- Sunlight shot: Shows metallic flake and pearl. Ask for one direct sun photo and one in shade.
- Panel alignment: Hold a straight edge to your screen. If reflections bend, panels may be warped.
- Touch-up spots: Look like dull dots. Zoom in on edges and corners.
- Primer vs paint: Primer is matte and gray. Painted panels show clearcoat shine.
Sensor-ready parts: why tiny cutouts matter
2024–2026 cars carry more electronics. Tiny holes can make or break fitment.
- Blind-spot indicators: Need mirror caps with clear windows or exact cutouts.
- Parking sensors: Round rings molded into bumper covers, with clips behind.
- Radar behind emblem: Emblems must be radar-permeable. Photos should show a smooth, non-metallic face.
- Front camera: Needs an exact bracket in the grille. Ask for a rear bracket close-up.
How to use exterior car body parts names with pictures to plan a repair
Photos help you order in the right sequence. Here’s a simple plan for a light front-end repair.
- Assess: Compare your car to exterior car body parts names with pictures to list affected parts.
- Measure: Check gaps. If the hood is centered, the bumper cover likely took the hit.
- Order: Start with structural supports and brackets. Then outer skins.
- Align: Test-fit before paint. Adjust tabs and check sensor alignment.
- Finalize: Install lights last. Test all electronics.
Picture checklist by part category
Use this quick checklist while you scan online listings. exterior car body parts names with pictures is built around how I read exterior car body parts names with pictures in minutes.
- Bumpers: Full face, corners, underside lip, all tabs, sensor holes, tow cover.
- Grilles: Front face, back clips, emblem mount, camera hole.
- Hood: Skin top, both sides, underside frame, latch zone, hinge areas.
- Fenders: Outer face, arch lip close-up, top flange holes, lower rear edge.
- Lights: Lens front, side, rear caps, mounting ears, connector plugs, lit test if possible.
- Mirrors: Front with cap, underside with camera/puddle lamp, plug, glass condition.
- Trunk/hatch: Outer skin, inner frame, spoiler mounts, wiring boots.
- Roof parts: Rail tracks, rail feet, end caps, any bends or dings.
Shipping and packing: what good photos promise
I ask sellers for a packaging shot, especially on fragile parts. It sounds picky, but exterior car body parts names with pictures saves time. Proper packaging shows foam corner guards, bubble wrap, and a firm box. For lights, look for lens film and end-cap protection. When listings for exterior car body parts names with pictures include packaging photos, I tend to trust them more.
Return policy traps to watch
Returns are part of online buying. Read the policy before you click buy.
- Painted parts: Most sellers won’t accept returns after you paint. Test-fit first.
- Electronics: Some require a photo of the connector before return. Keep your messages.
- Shipping damage: Inspect on delivery. Photograph the box and item right away.
- Core charges: Rare for body parts, but some lights or camera modules have them.
Hands-on tips: quick fixes before you install
These small steps make a new part sit like OEM.
- Warm plastics: Set bumper covers in a warm room so they relax before install.
- Clean tabs: Deburr aftermarket tabs with a utility knife for easy snaps.
- Replace clips: Old clips get brittle. Always buy fresh hardware.
- Loosen, align, tighten: Snug bolts, align gaps, then final torque. This prevents stress.
- Use PDR belts: Light dents near edges are fixable with the nylon belt kit above.
Insurance and estimates: using pictures to talk the same language
If you’re handling a claim, you need clear terms. Exterior car body parts names with pictures help you align with the adjuster. Send them the same part names: “Front bumper cover with PDC holes,” “Left bi-LED headlamp with AFS,” “Upper grille with camera bracket.” Include the seller photos that show those features. That speeds approvals and reduces back-and-forth.
How to find your paint code
Most cars list the paint code on a door jamb sticker or under the hood. It’s often a mix of letters and numbers. Once you have it, compare it to seller descriptions. If a listing shows the paint code in a photo, even better. In every search, I type my code plus exterior car body parts names with pictures to filter results to painted parts I can use.
Common mistakes I see buyers make
- Guessing trim level: The same model year may have different grilles and lights by trim.
- Ignoring sensors: Buying a “blank” bumper cover on a car with sensors.
- Forgetting inner brackets: Outer skins need brackets that are sold separately.
- Confusing sides: Ordering RH instead of LH. Always view from the driver seat perspective.
- Skipping test-fit: Painting before a dry fit. Always test-fit first.
2026 trends changing exterior parts
Automakers are blending aero, sensors, and lighting. The front emblem often hides radar. Grilles shrink as EVs need less cooling. Matrix LED headlamps become common. Expect more integrated cameras in mirrors and grilles. That means more exact part numbers and more reasons to rely on exterior car body parts names with pictures. The right name plus the right photo equals the right part.
Quick glossary: fast mapping for your next search
- Fascia: Another word for bumper cover.
- Valance/Diffuser: Lower rear bumper trim.
- CAPA: Certified Automotive Parts Association (quality standard).
- LH/RH: Left-hand (driver) / Right-hand (passenger) in US market.
- AFS: Adaptive Front-lighting System (swivels with steering).
- DRL: Daytime Running Light.
- PDC: Park Distance Control (parking sensors).
Step-by-step: using the nylon belt PDR tool on a fender
I use the belts from the product above to lift shallow dents at fender edges. Here’s the simple process.
- Clean the panel: Remove dirt so your tabs or lifter pads grip well.
- Anchor the belt: Loop it through a wheel spoke or a frame hook. Keep it low and steady.
- Attach lifter: Set a glue tab on the dent, heat gently if needed.
- Pull gently: Use the belt for steady counter-force. Pull in small steps. Check reflections often.
- Finish: Release slowly. Use an alcohol mix to pop the glue tab. Tap down high spots with a soft hammer.
Practice on a junk panel first. The goal is smooth, not perfect. This small fix helps a new molding sit flush when you follow guides built around exterior car body parts names with pictures.
How to price check with photos
Photo quality often predicts price. Perfect parts with OEM labels and clear tab shots cost more, but they save time. If two parts look the same, study edges and tabs. A single missing tab can add an hour of work. When I build a cart, I list the part names exactly as in exterior car body parts names with pictures. Then I add thumbnail notes like “tab ok” or “lens clear.” That lets me compare apples to apples.
Fitment hacks for tricky installs
- Heat gun on low: Relax tight bumper corners, but keep the gun moving.
- Painter’s tape: Protect paint while you align fenders and bumpers.
- Use guide pins: Old bolts with heads cut off make great alignment pins.
- Panel gap gauge: A plastic caliper helps you match factory gaps.
- Relearn sensors: After installs, some cars need a sensor relearn. Check your owner’s manual.
When to buy used, new aftermarket, or OEM
I use a simple rule set and the same language from exterior car body parts names with pictures.
- Used OEM: Great for panels and painted parts if the color matches and tabs are intact.
- New aftermarket: Good for bumper covers, grilles, and simple trims. Look for CAPA.
- New OEM: Best for complex lights, camera brackets, and radar emblems. Fewer headaches.
Pre-install checklist you can do from photos
- Count mounting points: Number of tabs and holes must match.
- Check for accessories: Foam, guides, inserts, and caps included or not.
- Verify electronics: Connectors and modules present for lights and sensors.
- Confirm finish: Painted, primed, or raw texture.
- Note shipping time: Large panels can take longer. Plan your shop time.
A quick visual map you can keep in your head
Front: Bumper cover, upper grille, lower grille, headlights, fogs, hood, fenders. Side: Mirrors, door shells, handles, rocker panels, side skirts, quarter panels. Rear: Bumper cover, valance, tail lights, trunk or hatch, spoiler. Roof: Windshield, roof moldings, rails, sunroof glass. That’s your mental index for exterior car body parts names with pictures. Say exterior car body parts names with pictures out loud once and you’ll remember it at checkout time.
FAQs Of exterior car body parts names with pictures
How do I know if a bumper cover fits my trim?
Match sensor holes, grille openings, and fog light pockets. Compare tabs in photos to your old bumper. Use your exact trim and year in the search.
Can I swap halogen headlights for LED versions?
Not directly on most cars. LED housings need different wiring, modules, and coding. Buy the same type or use a proper conversion kit and coding.
What does CAPA certified mean for body parts?
It’s a quality standard for aftermarket crash parts. CAPA parts aim to match OEM fit and finish. It’s a good sign when buying non-OEM.
How do I avoid buying the wrong side mirror?
Use LH (left/driver) and RH (right/passenger). Confirm camera, blind-spot, heat, and power fold features. Compare plug shape in photos.
Do I need calibration after replacing a windshield or bumper?
Often yes if your car has ADAS. Cameras and radar may need calibration. Check your owner’s manual and plan for a shop visit.
Final Verdict: Which Should You Buy?
Use exterior car body parts names with pictures to search smarter, compare tabs, and match sensors. Read photos like a checklist and test-fit before paint.
For small dings near edges, the nylon belt PDR set is a simple, low-cost win. It pairs well with this guide to exterior car body parts names with pictures.
knowing the anatomy changes everything. This 2026 guide breaks down exterior car body parts with clear visuals—so you diagnose damage fast, choose the right replacement, and avoid costly mistakes. Study once, buy right, fix confidently.
Exactly right. If your owner’s manual calls for 0W-20, that’s not a
Think of exterior body parts like a car’s anatomy—each panel has a job, and knowing the names **saves money, time
Speaking as a surgeon who trusts tools only when precision matters most ⚡🩺
Short-circuit and spark-proof protection aren’t “extras” here—they’re lifesavers. When rain, low light, or shaky hands enter the picture, clear status lights or a smart display guide every move, preventing costly mistakes and damaged electronics.
If you want a jump starter that works calmly, safely, and flawlessly under pressure, this is the kind of reliability worth buying—one smart choice that protects both your car and your confidence.