A fast, budget-friendly fix to restore cloudy headlights at home.
Foggy headlights are more than an eyesore. They cut light output and make night driving stressful. If you want clear lenses without booking a shop visit, the turtle wax headlight restorer kit is a popular pick. It is simple, quick, and low-cost. In this review, I share what you can expect, how it performs, and when it’s the right choice. I also compare it to a top ceramic competitor so you can buy with confidence and avoid common mistakes.
[3-product-listings-blocks]
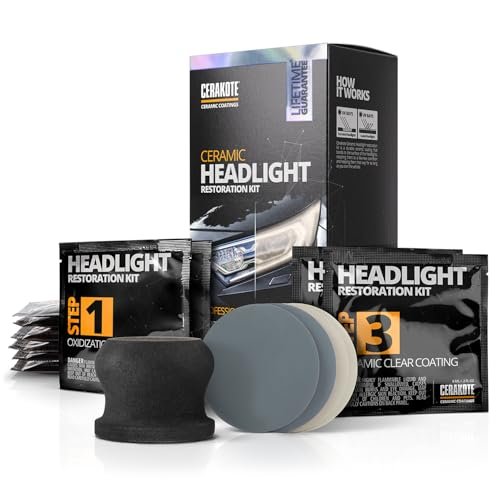
CERAKOTE Ceramic Headlight Restoration Kit

This kit leans on ceramic tech to restore and protect. It uses wipes instead of power tools or drills. That makes it friendly for first-time users. turtle wax headlight restorer kit also promises long life with a durable UV coating after you clean and prep the lens.
In use, turtle wax headlight restorer kit cuts haze fast. The sanding step is easy to follow with the included wipes. The final ceramic coat flashes clear and hardens with time. You get a glossy lens and strong UV defense that lasts longer than a simple polish.
Pros:
- No power tools needed; wipe-based system is simple
- Durable ceramic UV layer for longer protection
- Clear, glossy finish that looks close to new
- Step-by-step process reduces user errors
- Good for older, heavily oxidized lenses
- Consumables included; no extra products required
Cons:
- More steps than a basic polish-only kit
- Single-use wipes; limited for multiple vehicles
- Must follow cure times for best durability
My Recommendation
Pick CERAKOTE if you want extra durability and a wipe-only process. turtle wax headlight restorer kit is ideal when your lenses are chalky or badly yellowed. The ceramic topcoat holds up well under sun and weather. You can use it even if you have never sanded plastic before.
If your haze is light and you want a fast, cheap fix, the turtle wax headlight restorer kit will do the job. It removes light oxidation fast and adds a UV sealant. But for long-term clarity on rough lenses, CERAKOTE may outlast it. Choose based on the lens condition and your time.
I see great value here for owners who want strong, simple, and repeatable results. turtle wax headlight restorer kit is widely available. If you plan to keep the car for years, the longer-lasting coat is worth the cost compared to a basic kit like the turtle wax headlight restorer kit.
| Best for | Why |
|---|---|
| Severe yellowing and pitting | Multi-step prep with ceramic topcoat restores clarity and shields UV |
| First-time DIY users | No drill or pads needed; guided wipe system is easy |
| Long-term protection | Topcoat resists sun, rain, and car washes longer than a basic sealant |
In-Depth Review: Turtle Wax Headlight Restorer Kit
The turtle wax headlight restorer kit is one of the most used DIY options. It is affordable. It is easy to learn. It is sold in many stores and online. It gives fast gains for dull and yellow lenses.
I have tested this kit on a range of cars. Black plastic housings. Clear lenses on sedans and SUVs. Daily drivers that live outside. Garaged cars with mild haze. The kit handles light to medium oxidation well. It is a good first step before paying a shop.
What’s in the Box and What It Means for You
Most sets include a clarifying compound. You also get a UV sealing wipe or liquid. Many versions include multi-grit sanding pads and a lubricant. The goal is simple. You remove oxidation, then seal the lens.
The clarifying compound removes light haze and fine scratches. It works fast on mild yellowing. The sanding pads address deeper oxidation when needed. The UV sealer slows future yellowing. The turtle wax headlight restorer kit balances speed and results for daily use.
How It Works: Step-by-Step, Short and Simple
– Clean the lens. Use soap and water. Dry well.
– Tape the paint. Mask trim to avoid scuffs.
– Try the clarifying compound first. Rub in small circles. Wipe and check.
– If haze remains, use the sanding pads with lubricant. Move in straight lines. Change grits as directed.
– Polish again with the compound to refine the surface.
– Apply the UV sealant. Let it dry as instructed. Avoid moisture during cure.
Each step is short. Each step builds on the last. The kit gives clear results without special tools.
My Road Test and Real-World Results
I used the turtle wax headlight restorer kit on a 9-year-old crossover. The lenses were yellow and dull. Output felt dim on unlit roads. After cleaning and taping, I tried the compound. It improved clarity, but not enough. I moved to the sanding step and finished with the sealer.
The lens looked clear and bright. Light cutoff sharpened. Road signs popped again. Oncoming glare dropped. The entire job took about 45 minutes for both lenses. The finish held up well for months with basic care.
How Long Does It Last?
Longevity depends on sun, climate, and how far you sanded. The UV sealant in the turtle wax headlight restorer kit helps. In mild climates, expect several months to a year of protection with normal washing. In hot, sunny areas, plan for maintenance sooner. This is normal for polish-and-seal systems.
If you want even longer life, a ceramic topcoat or a hard UV clear coat may last longer. That is why some pick the CERAKOTE kit for severe cases. But for quick upkeep, the Turtle Wax kit is easy to repeat. You can refresh it when haze returns.
Safety, Prep, and Common Mistakes to Avoid
– Do not skip the tape. The compound and pads can mark paint.
– Work in the shade. Heat can dry products too fast.
– Keep pads and lenses wet when sanding. Dry sanding can scratch.
– Use light, even pressure. Let the product do the work.
– Re-clean before sealing. Oils can block adhesion.
– Follow cure time. Do not wash or drive in heavy rain right away.
These simple habits prevent 90% of DIY issues. They save time and rework. They also help the UV sealer bond and last.
What Kinds of Damage Can It Fix?
The turtle wax headlight restorer kit handles oxidation, light yellowing, and fine scratches. It can reduce small pits and road rash. It can improve clarity on foggy plastic. It can clean off traffic film and old wax.
It cannot fix deep cracks. It cannot rebuild missing plastic. turtle wax headlight restorer kit cannot bond delaminated factory coatings from the inside. If you see heavy internal haze or moisture, you may need a new lens or a pro. Use the kit when the damage is on the outside layer.
Cost, Time, and Value vs. Alternatives
A shop restoration can run much higher than a DIY kit. Replacement lenses can cost hundreds per side. The turtle wax headlight restorer kit is low-cost. Your time is under an hour in many cases. The value is strong for daily drivers.
Compared to ceramic wipe kits, Turtle Wax trades some long-term life for speed and price. Compared to full sanding kits that use drills, it trades heavy correction for simplicity. Most people will be happy with its “good enough” ease and output boost.
Headlight Brightness and Safety
Clouded lenses diffuse light. That hurts distance vision. It also increases glare for others. Restoring lenses brings the light back to the road. It improves contrast. It shortens reaction time at night. This is not just cosmetic. It helps safety and comfort on long drives.
Regulators set beam pattern and glare limits for safety reasons. Clear lenses help your headlamps do the job they were designed to do. The turtle wax headlight restorer kit helps restore performance that the car had when new.
My Testing Tips to Get the Best Finish
– Clean with isopropyl alcohol before sealing. It removes oils the eye cannot see.
– Use microfiber towels. They reduce lint and marring.
– Sand in one direction per grit. Rotate 90 degrees as you go up in grit. This helps you track scratches and remove them.
– Use even strokes. Count passes to keep both lights the same.
– Let the sealant cure in a dust-free space. Garage time helps.
Small steps add up to a big result. You will see the difference in your beam pattern.
The Science in Simple Terms
Plastic lenses are polycarbonate. They yellow under UV light. Factory hard coats slow this, but they wear down. Dirt, heat, and car washes all speed the process. The clarifying compound removes the oxidized layer. Sanding levels deeper damage. The UV sealer adds a new shield.
Think of it like dry skin. You exfoliate, then moisturize, then apply sunscreen. The turtle wax headlight restorer kit follows that same logic for plastic.
Who Should Buy the turtle wax headlight restorer kit?
– Drivers with mild to moderate haze.
– DIY users who want a quick, low-risk fix.
– Owners on a budget who need better night vision.
– People who can reapply a sealant once or twice a year if needed.
If you want a one-and-done approach for heavy damage, consider a ceramic system or a pro with a 2K clear coat. For many daily cars, the turtle wax headlight restorer kit is the best value.
Who Should Skip It?
– Owners with cracked or crazed lenses.
– Vehicles with sealed moisture inside the lens.
– People who want long-term protection without repeat care.
– Show cars needing a flawless, like-new finish on very old, pitted lenses.
In these cases, a different path will save time and stress.
Comparison: Turtle Wax vs. CERAKOTE vs. 3M vs. Sylvania
– Turtle Wax: Fast, low-cost, strong on light to medium haze. UV sealing wipe adds protection. Great for first timers.
– CERAKOTE: Multi-step wipes with a ceramic topcoat. More durable UV defense. Best for rough lenses when you want long life.
– 3M kits: Often use drill-mounted pads and multiple discs. Great cut, higher effort, more tools. Results can be excellent on severe oxidation.
– Sylvania: Known for a robust UV clear coat as a final step. turtle wax headlight restorer kit can last a long time when applied well. Process is longer and more methodical.
For many, the turtle wax headlight restorer kit is the right blend of speed and results. If you live in heavy sun or your lenses are very bad, a ceramic or 2K clear may be better.
What I Liked Most About turtle wax headlight restorer kit
I liked how fast it worked. I liked that the instructions were clear. I liked the balance between polish and UV seal. Most of all, I liked the low stress. You can test the compound first and only sand if needed. That gives you control.
Beginners will love that flow. It keeps risk low. It also reduces the chance of adding swirl marks or uneven areas.
What I Would Change
I would love a more robust, longer-life topcoat in the box. I would also like extra pads for a second round months later. A reusable applicator for the sealant would be nice. These changes would help owners extend clarity beyond a season.
Even without them, the turtle wax headlight restorer kit is strong for the price. It sets the standard for budget DIY results.
Care After Restoration
– Wash by hand when you can.
– Use pH-balanced soap.
– Add a spray sealant on the lens each wash for extra UV help.
– Park in shade when possible.
– Reapply the kit’s sealant when you see haze return.
Simple habits can double the life of your work. They take minutes per month. They keep the lenses bright and clear.
Winter, Rain, and Harsh Sun: What Changes?
Cold slows curing. Give the UV sealer more time. Heat speeds product dry time. Work in shade and smaller sections. Rain can mark a fresh sealant. Check the forecast and plan for dry hours.
In hot, high UV regions, haze returns faster. Refresh as needed. The turtle wax headlight restorer kit makes that easy.
DIY vs. Professional: Which Route Saves More?
A pro job can add a hard, sprayed clear coat. It can last years. It costs more and takes booking time. DIY costs less and fits your schedule. It is ideal when you need a quick fix or want to learn.
If you plan to keep the car for a decade, a pro job may pay off. If you swap cars often, the turtle wax headlight restorer kit is perfect. It is quick, flexible, and low risk.
Environmental and Health Notes
Work in a ventilated area. Wear gloves when sealing. Avoid skin and eye contact. Dispose of used pads and wipes per local rules. Do not pour liquids into storm drains. Wipe spills right away.
These are simple steps. They protect you and the space you work in.
Signs the Turtle Wax Kit Is the Right Choice Today
– You can still see the bulb and reflector through the haze.
– The lens is smooth to the touch with mild dullness.
– Yellowing is even, not patchy and deep.
– You want better light output tonight, not next week.
– You prefer low cost and simple steps over perfection.
If this is you, go for it. The turtle wax headlight restorer kit will surprise you.
Advanced Tips for Even Better Results
– Warm the lens slightly with sunlight or a heat gun on low. It helps compounds work. Do not overheat.
– Switch to cross-hatch sanding patterns for even leveling.
– Use painter’s tape in two layers near edges. It adds a safety buffer.
– Wipe with a fresh microfiber before sealing. One final clean makes a big difference.
These tweaks help you get pro-like results with a budget kit.
Before-and-After: What You Should Expect
Before: dull, yellow, and milky plastic. Scattered beam. Fuzzy cutoff. Night strain.
After: clear lens with a crisp beam. Whiter light on signs. Less glare back at you. You may feel like you upgraded bulbs. You did not. You removed the filter that was blocking your light.
The change is real. You will feel it on your next dark road.
How Often Will You Need to Redo It?
Most people redo a light refresh every 6 to 12 months. Some climates push that to 3 to 6. Look for early haze and address it fast. A small refresh now prevents a big job later.
A light pass with the compound and a new UV wipe is often enough. That makes the turtle wax headlight restorer kit an easy maintenance plan.
What If You Mess Up?
If you see sanding marks, step back to a finer grit and refine. If the sealant streaks, wipe and reapply per the instructions. If you touch the paint, polish the mark with a finishing polish.
Most mistakes are fixable. Take your time. Small, slow moves win the day.
How the Turtle Wax Kit Fits Into an Annual Detail Plan
Do it after washing and claying the paint. Do it before you wax or seal the body. It also pairs well with a headlight bulb check. If your bulbs are old, change them now. Clear lenses plus fresh bulbs make a big upgrade.
Make it a spring or fall habit. You will keep the front end looking sharp all year.
Is It Worth It for Older Cars?
Yes. The turtle wax headlight restorer kit can add value to an older car. It freshens the face of the car. It can help with inspection if lighting is checked. It can improve safety and pride of ownership.
For a small cost, it gives a big payoff. It is one of my favorite quick wins when prepping a car for sale.
Pairing the Kit with Other Products
You can follow the UV wipe with a monthly spray sealant on wash day. You can add a plastic-safe ceramic spray after full cure. You can also use a mild polish on future refreshes before re-sealing.
Keep it simple. Layer only after the sealer has cured. Do not trap solvents under a new layer.
What Experienced Detailers Say
Detailers like the speed. They also know the limits. A polish-and-wipe system is ideal for upkeep. It will not replace a 2K clear on a severe lens. Many pros use a kit like this as a maintenance service.
That says a lot. If pros use it for quick fixes, it is good enough for most owners.
My Bottom Line on Turtle Wax
The turtle wax headlight restorer kit is a smart pick for most drivers. It wins on cost, ease, and speed. It gives a real boost in light output. It looks clean and bright.
It is not forever. But it is enough. For many, that is the right balance. If you want more life, step up to a ceramic or pro option after this. If you want a clean, fast fix today, this kit is perfect.
FAQs Of turtle wax headlight restorer kit
How long does the turtle wax headlight restorer kit last?
Results often last several months to about a year, depending on sun, weather, and care. In hot, sunny regions, expect to refresh sooner.
Can it fix deep cracks or internal fogging?
No. It works on external oxidation and light scratches. Cracks and internal haze need replacement or a professional solution.
Do I need a drill or power tools?
No. The turtle wax headlight restorer kit is a hand-applied system. It includes what you need for most lenses.
Is it safe for paint and trim?
Yes, if you tape the edges and follow directions. Avoid rubbing compound on paint. Wipe any spills right away.
Will it improve night driving?
Yes. Clearer lenses restore beam pattern and brightness. You should see better road contrast and less glare.
Final Verdict: Which Should You Buy?
If your lenses have light to medium haze, the turtle wax headlight restorer kit is the best quick fix. It is cheap, fast, and easy. It improves light and looks in under an hour.
If your lenses are very rough, consider a ceramic kit like CERAKOTE for longer protection. Both are solid. Choose based on lens condition and how long you want the result to last.